Arduino Mega 2560
When the Uno runs out of room, reach for the Mega. The Arduino Mega 2560 swaps in the bigger ATmega2560 for 54 digital pins, 16 analog inputs, four serial ports and 256 KB of flash — while running the exact same code. This guide covers the full board anatomy, a complete pinout with every pin explained, power & programming, the buses, a Mega vs Uno vs Nano comparison, and finishes with code and mini-projects.
Complete Learning Path — Arduino Mega 2560
From board anatomy and the ATmega2560, to a full pinout with every pin detailed, power, digital & analog I/O, the four serial ports, the buses, uploading, Mega vs Uno vs Nano, code and mini-projects
What is the Arduino Mega 2560?
The Arduino Mega 2560 is the big-board member of the Arduino family, built around the 8-bit ATmega2560. It looks like a stretched Uno — same 5 V logic and IDE — but with far more pins, memory and serial ports.
Use it when a project simply needs more: dozens of sensors and outputs, a big LED matrix, a 3D-printer controller, or several serial devices at once.
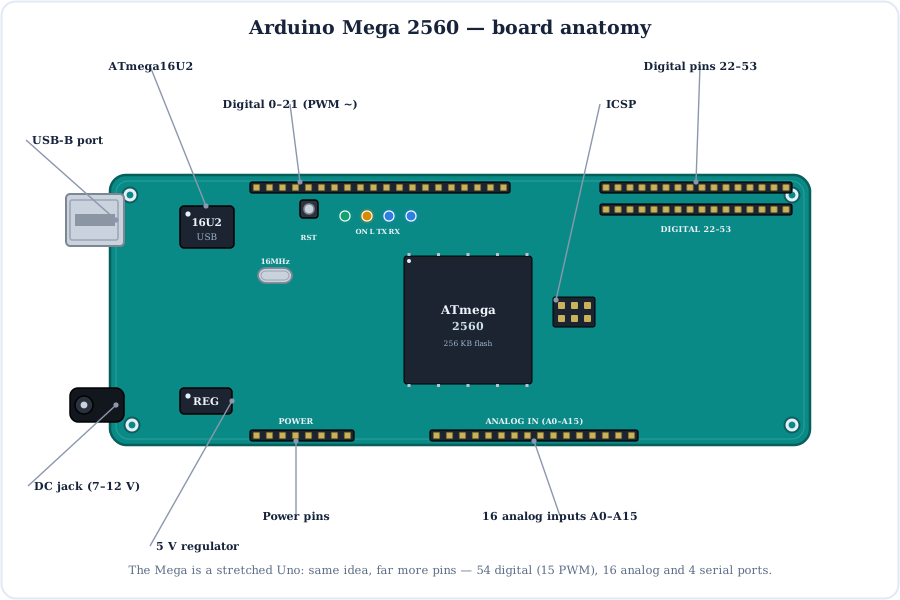
The Brain: ATmega2560
The ATmega2560 is a bigger cousin of the Uno's chip — same 8-bit AVR core at 16 MHz, but with roughly 8× the flash, 4× the RAM and far more I/O.
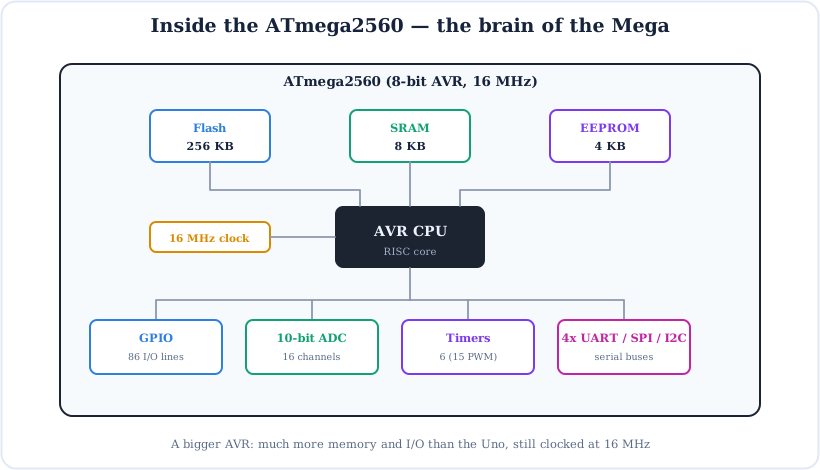
- Flash (256 KB) — room for big programs; ~8 KB is the bootloader.
- SRAM (8 KB) — four times the Uno's, for larger buffers and arrays.
- EEPROM (4 KB) — non-volatile store for settings and calibration.
- Peripherals — 16-channel 10-bit ADC, six timers (15 PWM outputs), and four hardware UARTs plus SPI and I2C.
Full Arduino Mega 2560 Pinout
Here is the complete pinout, colour-coded by function. Every one of the 54 digital pins and 16 analog inputs is shown, with PWM (~), serial, SPI and I2C pins highlighted.
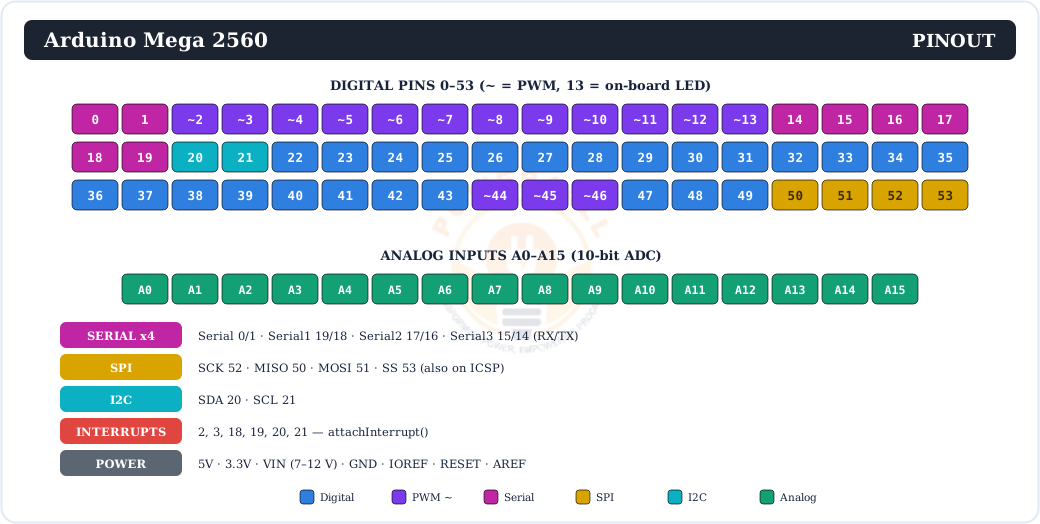
Prefer the short version? These cards summarise the pin groups and their counts:
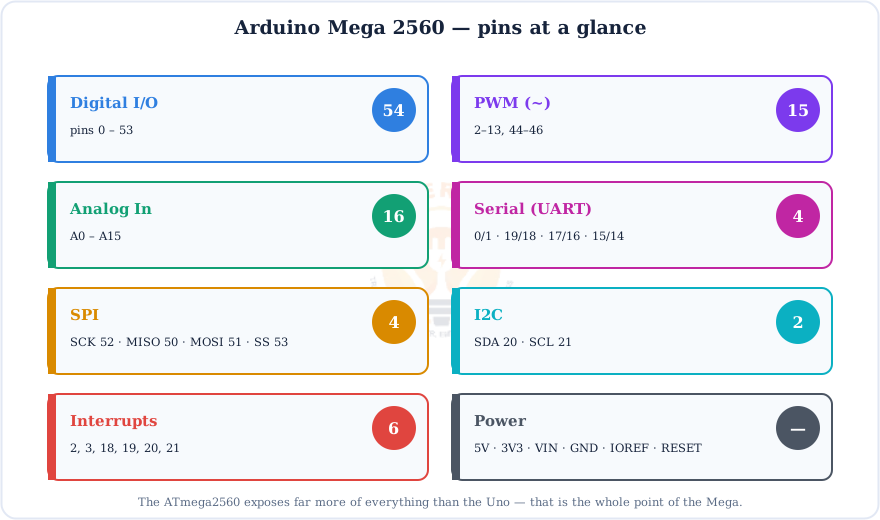
Every Pin Explained
Let's go through each group of pins and exactly what it does. Where the Mega differs from the Uno, it's called out.
Digital pins (0–53)
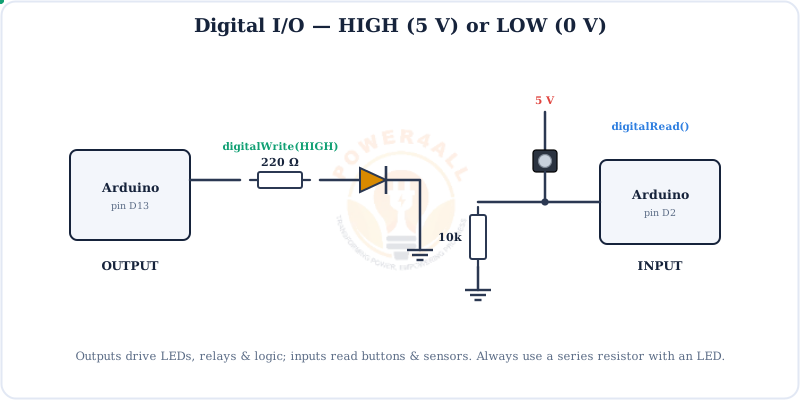
54 general-purpose pins that read or write HIGH (5 V) or LOW (0 V) with pinMode(), digitalWrite() and digitalRead(). Each handles ~20 mA (40 mA max). Pins 22–53 form the big double-row block at the end of the board — ideal for wiring lots of LEDs, buttons or a keypad.
PWM (~) — 15 pins
Pins 2–13 and 44–46 — analogWrite(0–255) for dimming, speed & tone.
External interrupts
Pins 2, 3, 18, 19, 20, 21 — respond instantly with attachInterrupt().
SPI
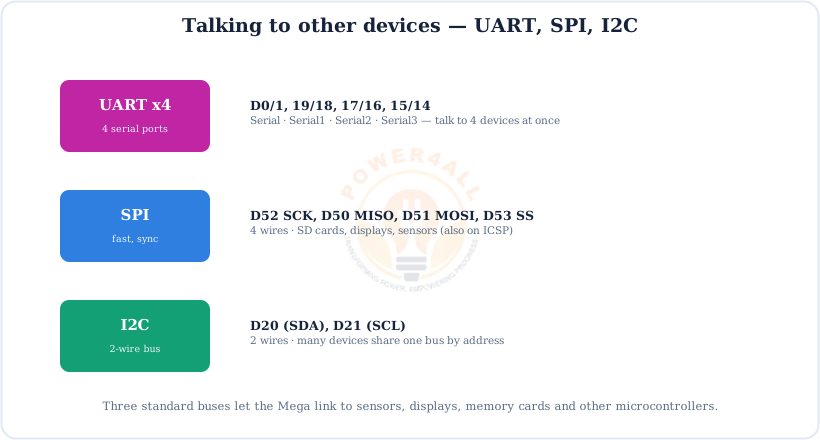
50 = MISO, 51 = MOSI, 52 = SCK, 53 = SS (also on the ICSP header).
I2C
20 = SDA, 21 = SCL — note: not A4/A5 like the Uno.
Pin 13
Wired to the on-board “L” LED — a first test with no extra parts.
Serial (UART) — four ports
The Mega's stand-out feature: four hardware serial ports, so it can talk to several serial devices at once (see the diagram below).
| Port | RX / TX pins | Typical use |
|---|---|---|
| Serial | 0 (RX) / 1 (TX) | USB & Serial Monitor |
| Serial1 | 19 (RX) / 18 (TX) | GPS, GSM modules |
| Serial2 | 17 (RX) / 16 (TX) | Bluetooth (HC-05) |
| Serial3 | 15 (RX) / 14 (TX) | a second microcontroller |
Analog input pins (A0–A15)
16 analog inputs (more than any other classic Arduino), each a 10-bit ADC reading 0–5 V as 0–1023 via analogRead(). They double as digital pins 54–69.
Power pins
| Pin | What it does |
|---|---|
| VIN | Raw input — feed 7–12 V here to power the board. |
| 5V | Regulated 5 V output for sensors and modules. |
| 3.3V | 3.3 V from the on-board regulator, ~50 mA. |
| GND | Ground (0 V) — several GND pins around the board. |
| IOREF | Tells shields the board's logic voltage (5 V). |
| RESET | Pull LOW to restart the sketch. |
Coming from the Uno? Two gotchas
On the Mega, SPI is on 50–53 (not 11–13) and I2C is on 20/21 (not A4/A5). Most Uno shields still fit the header at one end, but libraries that hard-code those Uno pins may need the Mega pins instead.
Powering the Mega
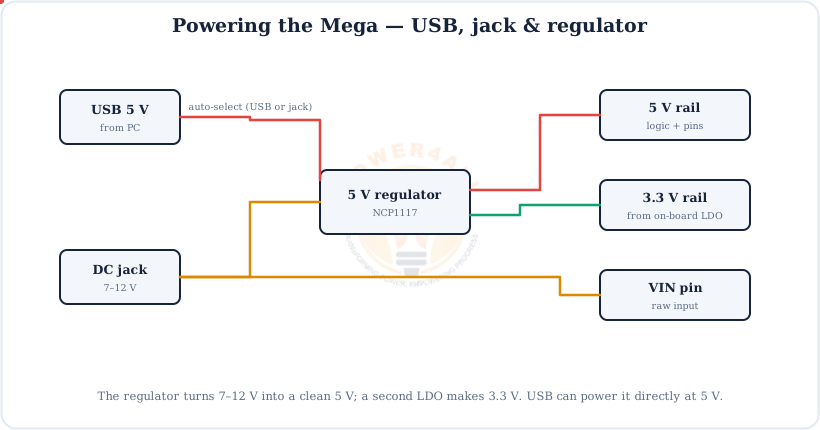
Like the Uno, the Mega takes power from USB (5 V), a 7–12 V DC jack, or the VIN pin. An on-board regulator makes the clean 5 V the chip needs.
Give big loads their own supply
With 54 pins it's tempting to drive a lot at once, but the 5 V pin still only supplies a few hundred mA. Motors, servos and LED strips need their own supply with a common ground.
Digital I/O
Digital pins are the simplest: output a HIGH/LOW to drive an LED or relay, or read a HIGH/LOW input from a button or sensor — the same on all 54 pins.
// blink one of the 22-53 block pins
void setup() { pinMode(30, OUTPUT); pinMode(2, INPUT_PULLUP); }
void loop() {
  if (digitalRead(2) == LOW) digitalWrite(30, HIGH);
  else                       digitalWrite(30, LOW);
}
PWM Output (~)
PWM fakes an analog voltage by switching a pin on and off fast. The Mega has 15 PWM pins (vs 6 on the Uno): 2–13 and 44–46.
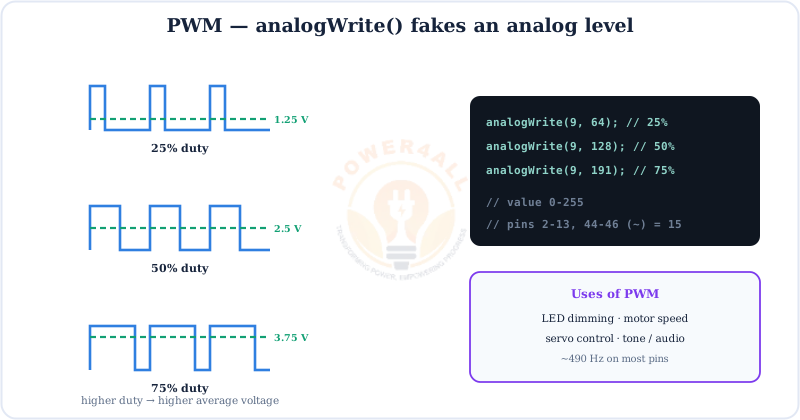
analogWrite(pin, 0–255) on any of the 15 ~ pins.// fade an LED on a PWM pin (~9) void setup() { pinMode(9, OUTPUT); } void loop() { for (int v = 0; v <= 255; v++) { analogWrite(9, v); delay(5); } for (int v = 255; v >= 0; v--) { analogWrite(9, v); delay(5); } }
Analog Input (ADC)
The Mega's 16 analog pins measure a continuous voltage. The 10-bit ADC turns 0–5 V into 0–1023 — enough inputs for a whole panel of sensors or potentiometers.
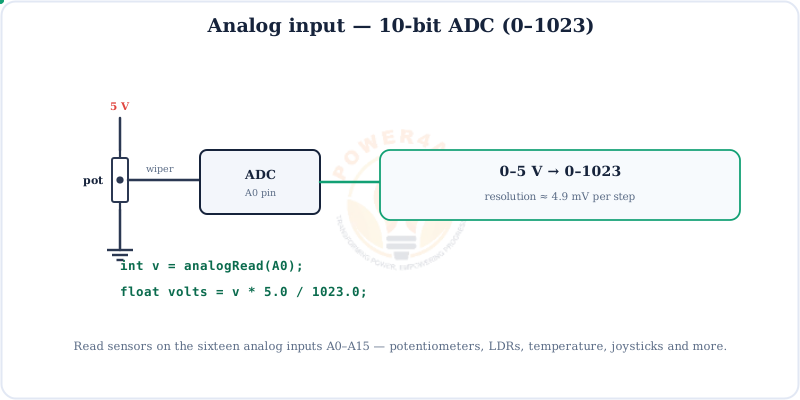
v * 5.0 / 1023.0.// read all 16 analog inputs void setup() { Serial.begin(9600); } void loop() { for (int i = 0; i < 16; i++) { Serial.print(analogRead(A0 + i)); Serial.print(' '); } Serial.println(); delay(300); }
Four Serial Ports
This is the Mega's signature feature. Where the Uno has one serial port, the Mega has four — so it can log to the PC and talk to GPS, Bluetooth and another board, all at the same time.
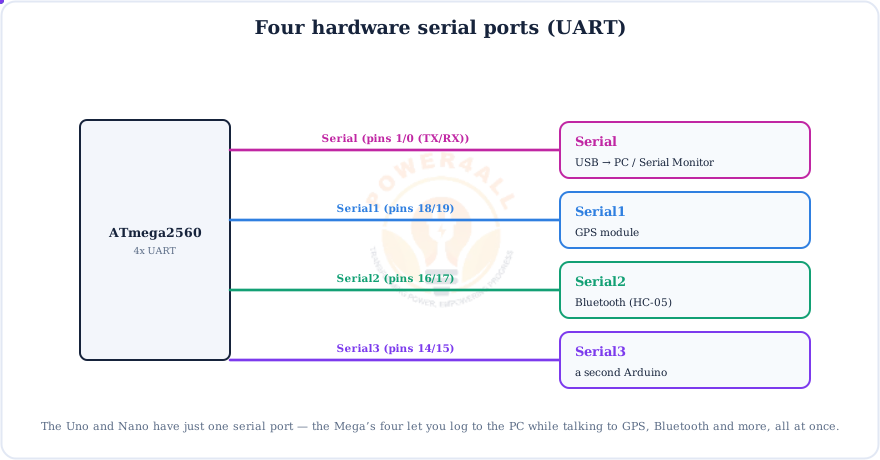
Serial, Serial1, Serial2, Serial3 — each with its own RX/TX pins.// use two serial ports at once void setup() { Serial.begin(9600); // USB / PC monitor Serial1.begin(9600); // e.g. a GPS on pins 19/18 } void loop() { if (Serial1.available()) Serial.write(Serial1.read()); // forward GPS data to the PC }
SPI & I2C
Besides the four UARTs, the Mega has hardware SPI and I2C — note the pins differ from the Uno.
How Code Gets onto the Mega
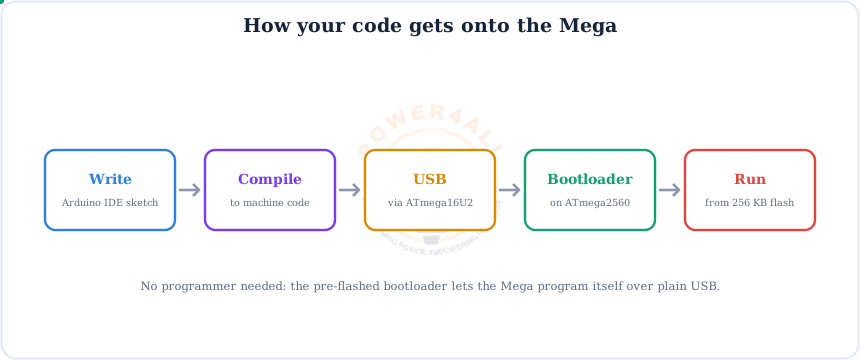
Exactly like the Uno: write a sketch in the Arduino IDE, connect USB, pick Arduino Mega 2560 as the board, and upload.
Pick the right board
In the IDE choose Tools → Board → Arduino Mega or Mega 2560, and the matching port. Uploading an Uno-targeted binary won't use the extra pins or memory.
Mega vs Uno vs Nano
All three run the same 16 MHz AVR code. The Mega simply has more of everything — pick it when you outgrow the smaller boards.
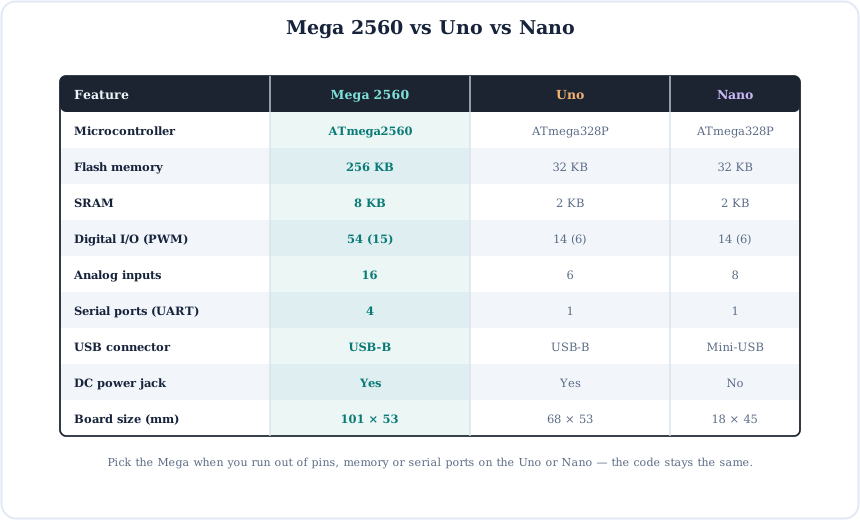
Choose the Mega when you run out of pins, memory or serial ports; the Uno for learning and shields; the Nano for compact, breadboard builds.
Code Examples
The everyday building blocks — identical to the Uno, just with more pins to choose from.
1. Blink the on-board LED
void setup() {
  pinMode(LED_BUILTIN, OUTPUT);       // pin 13
}
void loop() {
  digitalWrite(LED_BUILTIN, HIGH);
  delay(1000);
  digitalWrite(LED_BUILTIN, LOW);
  delay(1000);
}
2. Chase LEDs across the 22–53 block
void setup() {
  for (int p = 22; p <= 29; p++) pinMode(p, OUTPUT);
}
void loop() {
  for (int p = 22; p <= 29; p++) {
    digitalWrite(p, HIGH); delay(80); digitalWrite(p, LOW);
  }
}
3. Read a button (internal pull-up)
void setup() {
  pinMode(2, INPUT_PULLUP);           // no external resistor needed
  pinMode(13, OUTPUT);
}
void loop() {
  digitalWrite(13, digitalRead(2) == LOW ? HIGH : LOW);
}
Beginner Mini-Projects
The Mega shines when a project needs lots of I/O. Each project below is complete — upload and go.
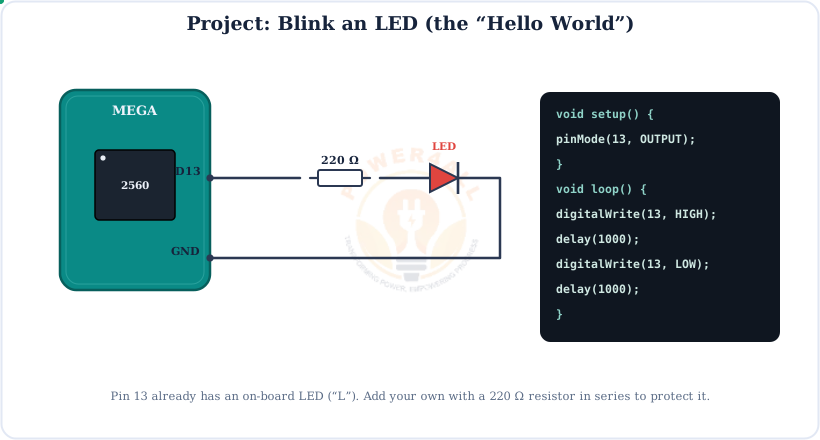
Project 1 — Blink an LED
void setup() { pinMode(13, OUTPUT); }
void loop() {
  digitalWrite(13, HIGH); delay(500);
  digitalWrite(13, LOW);  delay(500);
}
Project 2 — 8-LED running light
void setup() {
  for (int p = 22; p <= 29; p++) pinMode(p, OUTPUT);
}
void loop() {
  for (int p = 22; p <= 29; p++) {
    digitalWrite(p, HIGH); delay(100); digitalWrite(p, LOW);
  }
}
Project 3 — Two serial devices at once
void setup() {
  Serial.begin(9600);      // to PC
  Serial1.begin(9600);     // to the module
}
void loop() {
  if (Serial1.available()) Serial.write(Serial1.read());
  if (Serial.available())  Serial1.write(Serial.read());
}
Project 4 — 16-channel sensor logger
void setup() { Serial.begin(9600); }
void loop() {
  for (int i = 0; i < 16; i++) {
    Serial.print("A"); Serial.print(i); Serial.print("=");
    Serial.print(analogRead(A0 + i)); Serial.print("  ");
  }
  Serial.println();
  delay(500);
}
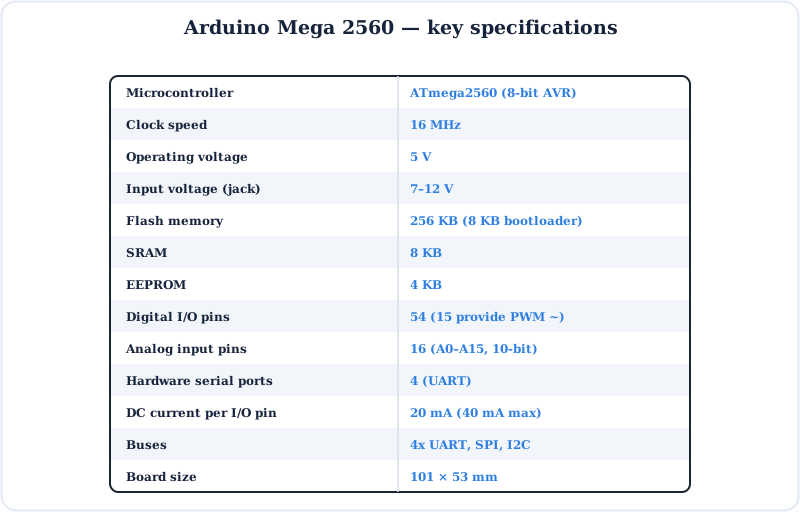
Specifications
The Arduino Mega 2560 at a glance.
Key Terms — Glossary
| Term | Meaning |
|---|---|
| Microcontroller | A single chip with CPU, memory and I/O — here, the ATmega2560. |
| Sketch | An Arduino program, with setup() and loop(). |
| UART / Serial | Hardware serial port; the Mega has four (Serial, Serial1–3). |
| PWM (~) | Pulse-width modulation; 15 pins on the Mega (2–13, 44–46). |
| ADC | Analog-to-digital converter; 16 channels, 10-bit (0–1023). |
| SPI | Fast 4-wire bus on 50–53 (and ICSP). |
| I2C | 2-wire bus on 20 (SDA) / 21 (SCL). |
| Bootloader | Small program that lets the Mega flash itself over USB. |
| VIN | Raw voltage input (7–12 V) to power the board. |
Frequently Asked Questions
Quick answers to the questions people ask most about the Arduino Mega 2560.
What is the Arduino Mega 2560?
A microcontroller board built around the 8-bit ATmega2560 at 16 MHz, with 54 digital pins (15 PWM), 16 analog inputs, four hardware serial ports, 256 KB flash and 5 V logic. It runs the same code as the Uno but with far more pins and memory.
How many pins does the Mega have?
54 digital I/O pins (0–53), 15 of them PWM (2–13, 44–46), plus 16 analog inputs (A0–A15) and power pins: 5V, 3.3V, VIN, GND, IOREF, RESET and AREF.
How many analog and serial pins?
16 analog inputs (A0–A15) and four serial ports: Serial (0/1), Serial1 (19/18), Serial2 (17/16), Serial3 (15/14).
Which pins are PWM on the Mega?
Fifteen: pins 2, 3, 4, 5, 6, 7, 8, 9, 10, 11, 12, 13, 44, 45 and 46. Drive them with analogWrite(pin, 0–255).
Where are SPI and I2C on the Mega?
SPI is on 50 (MISO), 51 (MOSI), 52 (SCK), 53 (SS), and on the ICSP header. I2C is on 20 (SDA) and 21 (SCL) — not A4/A5 like the Uno.
What microcontroller does the Mega use?
The Microchip ATmega2560: an 8-bit AVR with 256 KB flash, 8 KB SRAM, 4 KB EEPROM, a 16-channel 10-bit ADC, six timers and four hardware UARTs, at 16 MHz.
Mega vs Uno — which should I use?
Use the Uno for learning and most simple projects. Move to the Mega when you need more than 14 digital pins, more than 6 analog inputs, more than one serial port, or more than 32 KB of program space.
Do Uno shields work on the Mega?
Most fit physically, since the Mega keeps the Uno header layout at one end. Watch out for shields that assume SPI is on pins 11–13 or I2C on A4/A5 — on the Mega those buses are on 50–53 and 20/21.
Conclusion & Key Takeaways
The Arduino Mega 2560 is the Arduino you reach for when a project gets big — the same easy code, with room to spare.
ATmega2560
16 MHz, 256 KB flash.
54 + 16 pins
Digital + analog.
15 PWM
2–13, 44–46.
4 serial ports
Talk to many devices.
SPI 50–53
I2C on 20/21.
Uno-compatible
Same sketches run.